Until recently, only legal entities could create bots in MAX. Now self-employed individuals can do it too, something many have been waiting for. This means even more professionals can use MAX as an extra channel for communicating with clients and start automating part of their processes.
You don't need to start with complex scenarios. For most tasks, a simple bot that takes requests, answers common questions and helps users quickly find the information they need is enough. If needed, you can always add a mini app with broader capabilities.
Creating a MAX channel as a self-employed professional
The basic steps to create a channel are:
Go to MAX for Business at business.max.ru
Choose to create a channel.
Enter a name, description and topic.
Add an avatar and a short welcome message.
Publish your first pinned post: who you are, how you can help your subscribers or clients, and how to contact you.
When the bot is ready, add a link to it.
In practice, it's best to connect the channel to a funnel right away. A person reads a post, taps a button, lands in the bot, chooses a service and submits a request. That's clearer for both you and the client.
Step-by-step guide to creating a bot in MAX
If your channel is ready, the bot has a clear task and you understand the user journey where the bot will streamline your work, let's move on to creating the bot:
Go to your profile on the platform
In the Chatbots section, click Create
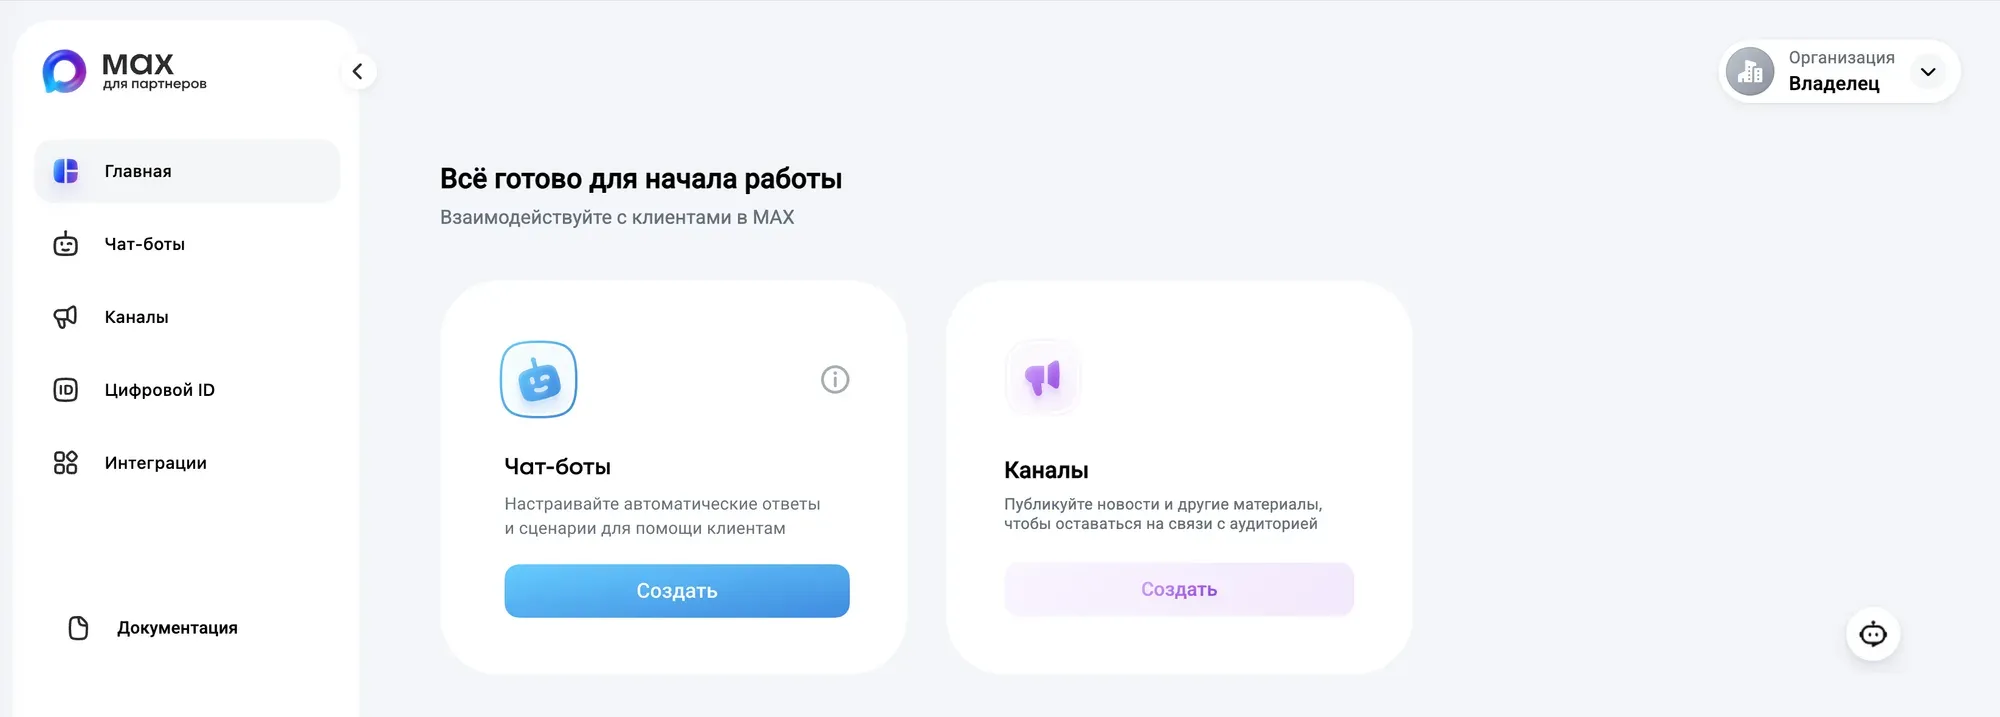
Fill in the details in the bot settings (its profile card) and click Create
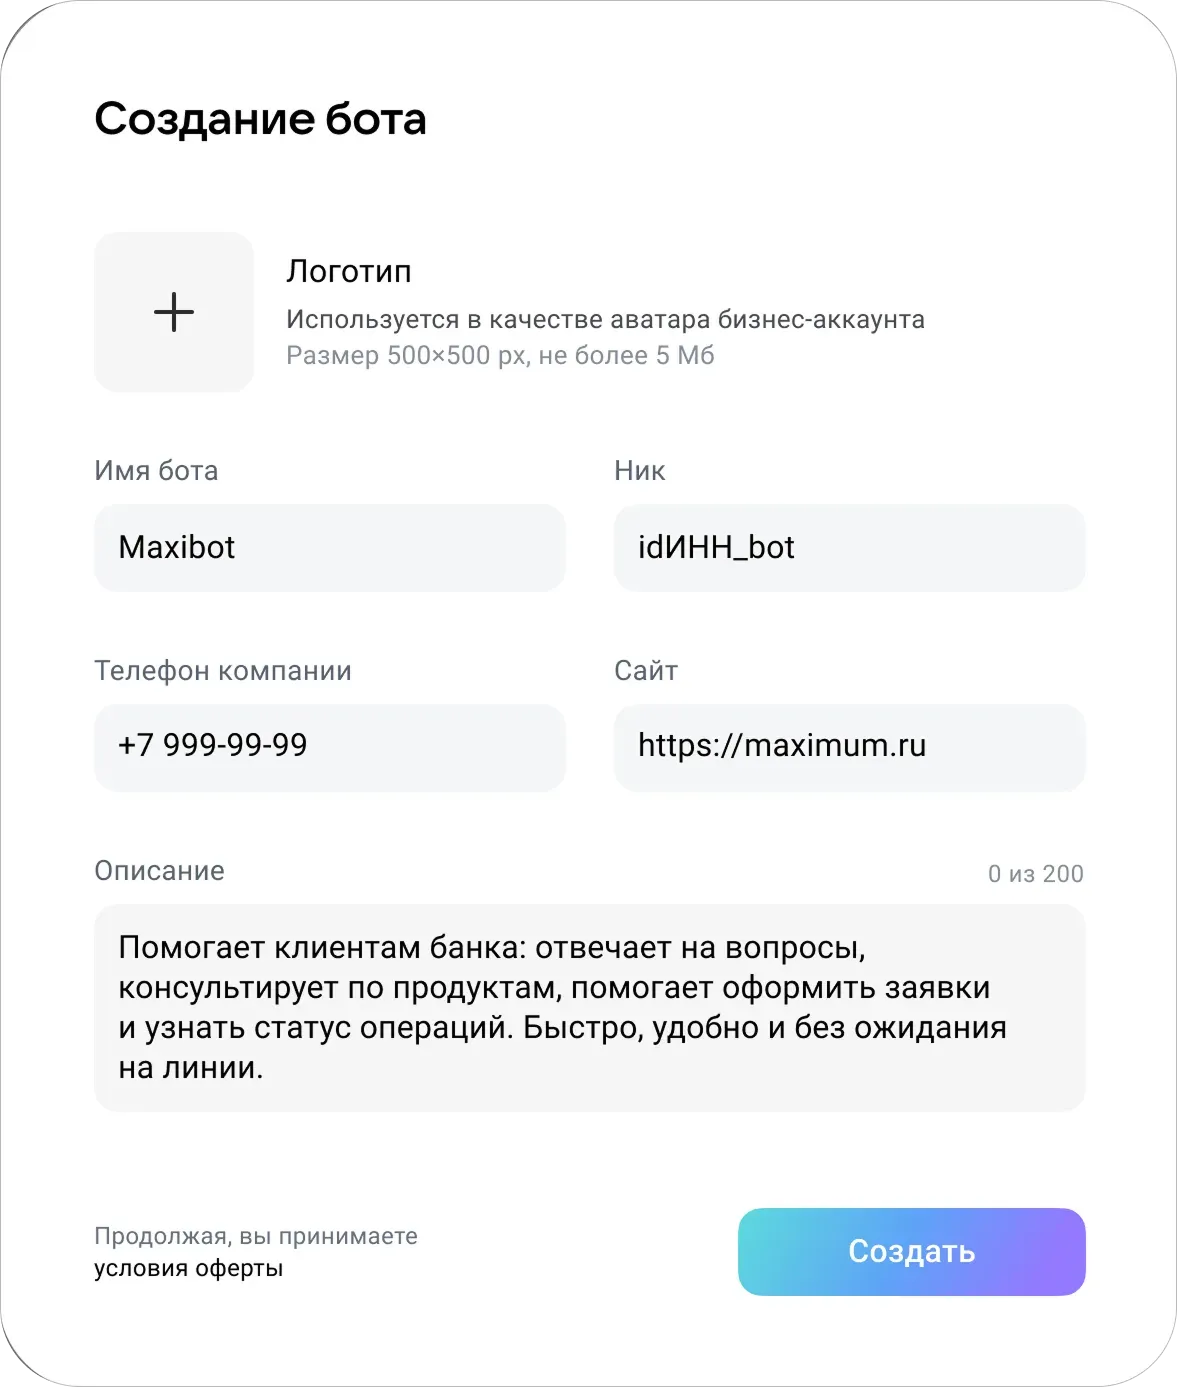
The bot will then go to moderation. Notifications about moderation status changes will arrive in your private messages from the MAX for Business bot
4. Next, click "Integration"
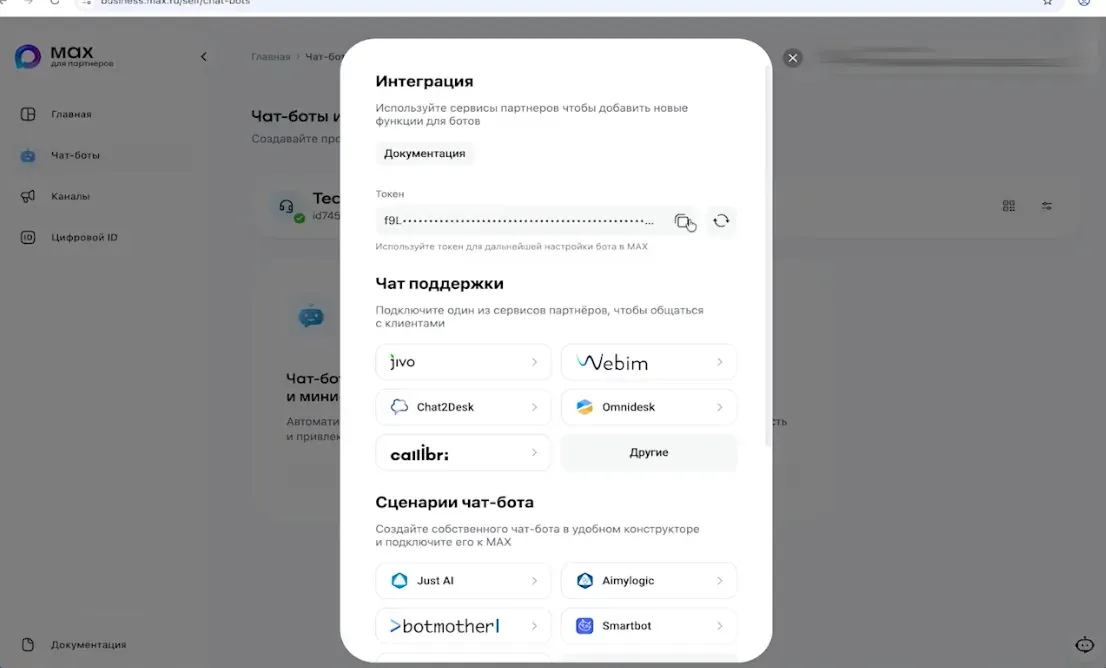
5. Get the token, copy it and enter it in puzzlebot when connecting MAX to your project
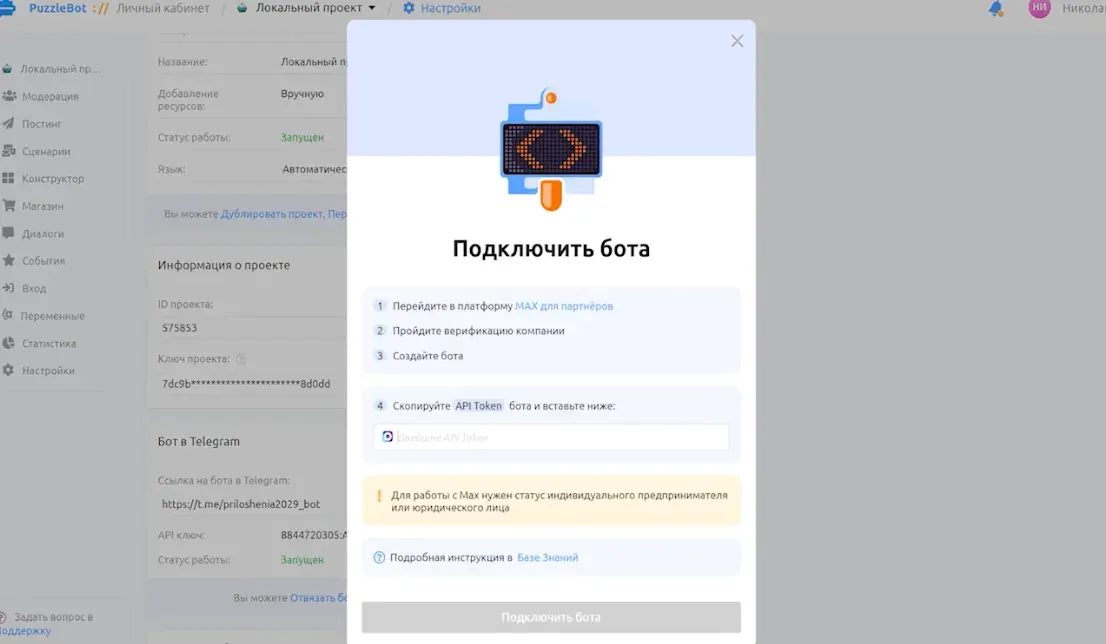
6. Done
2. Basic structure of an expert's bot
To start, these sections are enough:
services;
prices or work formats;
available slots;
reviews;
ask a question;
submit a request.
3. Set up your first scenario
An example for an expert:
The user taps "Book".
The bot asks which service they need.
It asks for a convenient time.
It collects their name and contact details.
It sends the client a confirmation.
You get a notification about the new request.
4. Test the launch
Go through the client journey yourself. Tap every button, send a test request, check the notifications and texts.
If at some stage you have questions, feel like quitting, or something is unclear, your client will most likely run into the same thing. It's better to remove unnecessary steps right away.
This is easy to do in puzzlebot. In the Constructor, you can plan the scenario and build it right away without coding. We've long worked with visual scenarios, buttons, conditions, forms and automated funnels.
Step-by-step guide to creating a mini app
Add a mini app when a bot alone is no longer enough. For example, if you need attractive visuals, a catalog, service cards and so on. It will help you stand out from other professionals.
If you want to build a mini app in MAX, follow these steps.
1. Choose one block you want to package into a mini app
Don't try to fit everything in at once. Good options for a first launch:
a service catalog;
a booking form;
a mini store of digital materials.
2. Plan and create the tabs
3–5 tabs are enough to start:
Home screen.
List of services.
Service card.
Request form.
Confirmation screen.
3. Prepare the content
Gather service names, descriptions, prices, images, form questions and the text users will see after submitting a request in advance.
4. Create the mini app in MAX for Business
Once all the information is collected and ready, you can move on to building it.
The process is very similar to creating a bot (we attached all the screenshots above):
Go to MAX for Business again.
Find the "Chatbots and mini apps" block and click the "Set up" button.
Copy the mini app link in the puzzlebot Constructor and paste it into the Mini app block in MAX.
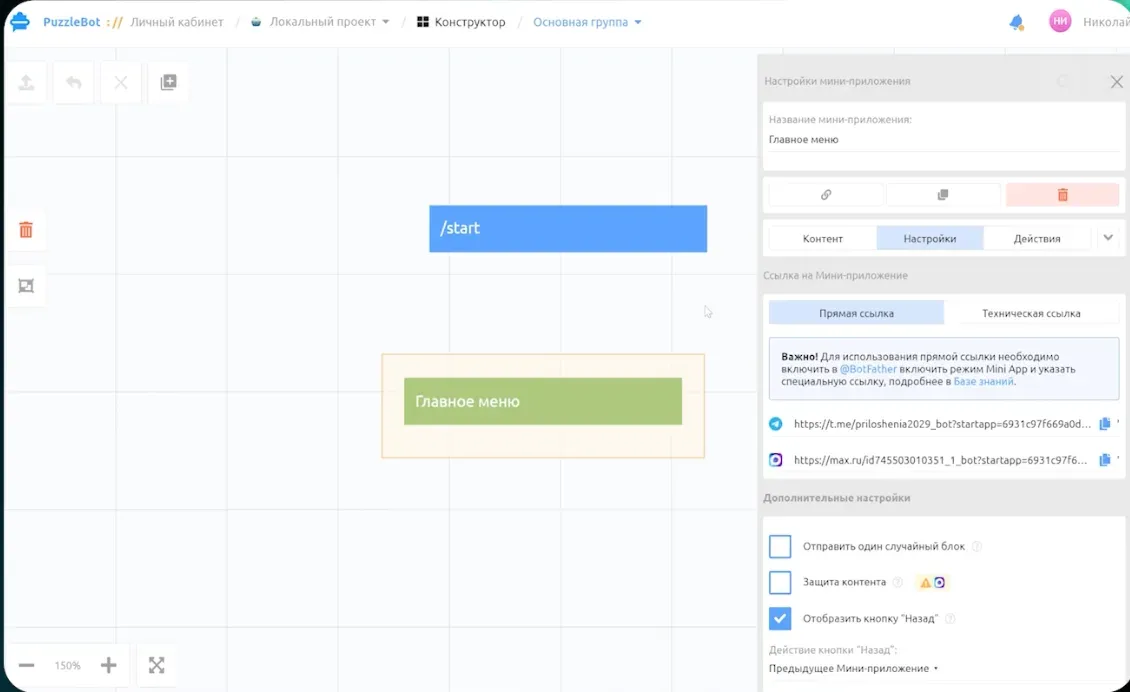
4. Then choose the launch icon and save.
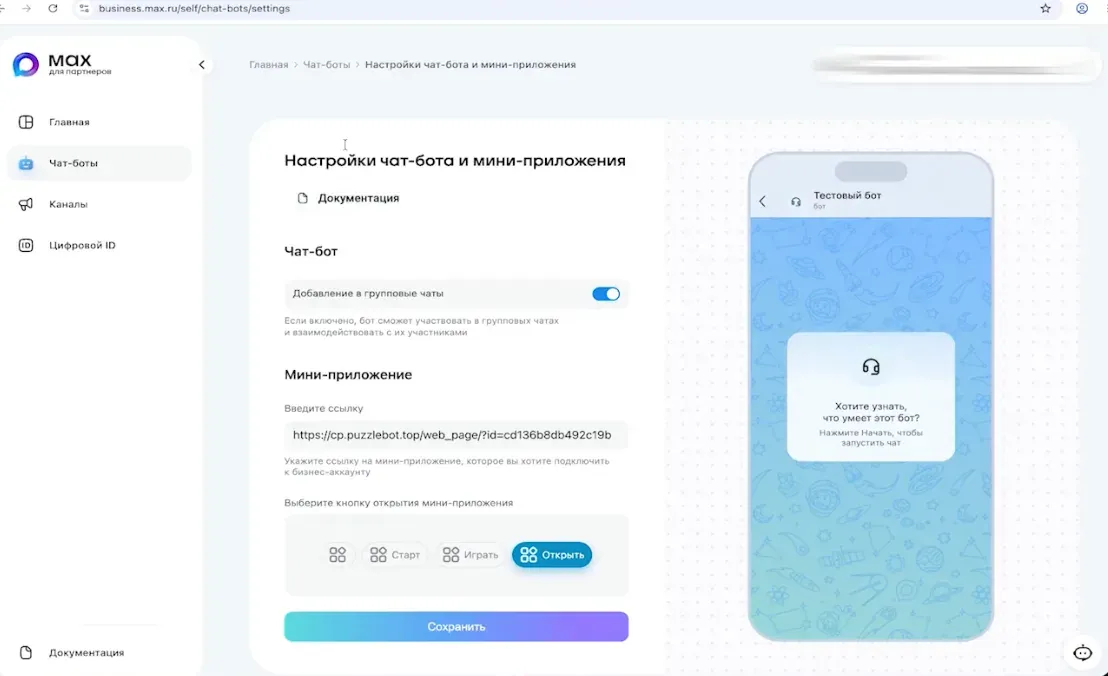
5. The mini app is now connected to the bot
5. Test the client journey
Be sure to check everything on a phone. Is it easy to read, is it clear where to tap, is there too much text? Most problems show up on a mobile screen, and it's better to spot them yourself than to collect annoyed messages from clients later.
There's one rule people often stumble over at the start: build a mini app around the task, not the interface. First decide what exactly the person should do: book, choose a service, pay, submit a request or get a resource. Only then think about the visuals.
In conclusion
If you're launching your first bot in MAX, start small: one service, one form, one notification, one clear result for the client. After that, you can add a mini app and more complex scenarios.
If you want to build a foundation quickly, try making a bot or mini app in puzzlebot. It makes it easier to package your funnel, test the mechanics and prepare a clear structure for launching in MAX