In this guide, Svetlana Gizatulina explains how to run an internal balance in a bot: users earn it for activity and can spend it on useful products such as a guide, a lesson or another format.
How the bot works
To make things clear, we'll walk through the mechanics using a ready-made chatbot: try it in Telegram.
https://leonardo.osnova.io/dd9f7ea2-9ea1-5657-b911-551257bfd81f/-/format/mp4/#t=0.1;hd=1&autoplay=1
The bot starts with the /start command. It then sends a welcome message, and a button opens the user's personal account. It shows:
1. The current balance.
2. A list of actions that earn internal units (ye).
3. Available products (if the balance is sufficient).
4. Information on other ways to earn.
Users receive units (ye) for subscribing and for filling out a questionnaire, once each. When they have saved up enough, they can exchange the units for a product: a guide and/or a lesson. When they do:
1. The balance is deducted.
2. A category is assigned (for example, "received the guide").
3. The button changes, so the product can't be purchased again.
The admin has an extra button for crediting a user's balance manually.
Which buttons and access a user sees is controlled by condition buttons with categories and variables. Now let's look at how to build these mechanics in puzzlebot, from variables to commands and conditions.
Step 1. Connect your bot to puzzlebot
You can find out how in the knowledge base: https://help.puzzlebot.top/article?r=3&a=18
Step 2. Create variables
You'll need two variables:
1. balans: a personal variable for the user's internal balance.
2. balans_gl: a global variable for crediting the balance manually.
Setting up the personal variable
1. Open the Variables section and click + Add variable.
2. Fill in the fields:
Variable type: personal.
Variable name: for example, balans (Latin letters, no spaces).
Value type: regular.
Value format: number.
Default value: 0.
Description: a comment for your convenience.
3. Save the settings.

Setting up the personal variable
Now every user has their own balance, which we'll work with in the next steps.
Setting up the global variable
1. Open the Variables section and click +Add variable.
2. Fill in the fields:
Variable type: global.
Variable name: for example, balans_gl (Latin letters, no spaces).
Value type: regular.
Value format: number.
Default value: 0.
Description: a comment for your convenience.
3. Save the settings.

Setting up the global variable
Now you can use an admin button to pass a value from the global variable to the user variable. We'll cover this in a separate step.
Step 3. Create categories
Categories in puzzlebot help you segment users and can also be used in logic: to grant access to a command group or specific scenarios, or to show and hide buttons.
To set up the internal balance system, create the following categories:
1. Received balance for subscribing.
2. Received balance for the questionnaire.
3. Received access to the guide.
4. Received access to the lesson.
5. Rights to credit ye: a separate category for the admin that gives access to crediting a user's balance manually.

Categories
How to create a category:
1. Open the Moderation section and click +.
2. Enter the category name in the field that appears and click Create category.
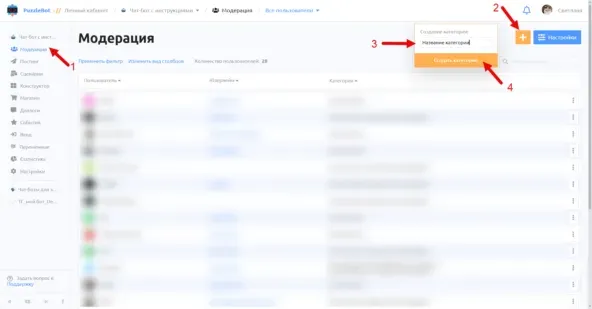
Creating a category
Step 4. Set up commands
Let's set up the commands for crediting, deducting and delivering the product.
Scenario: crediting the balance for subscribing to a channel or group
The user gets a credit to their internal balance (ye) if they subscribe to a Telegram channel.
To build this, you'll need:
1. A condition button: shown in the personal account if the user hasn't yet been credited for subscribing (that is, they don't have the "Received balance for subscribing" category).
2. A condition that checks the subscription:
If the user is subscribed, it credits the balance, assigns the category and sends a message confirming the credit.
If the user is not subscribed, it sends a command reminding them to subscribe.
3. Inline command 1: an intermediate command that shows the condition and uses a button to route the user to the right branch.
4. Inline command 2: the message sent if the user is subscribed (opened via the condition).
5. Inline command 3: the message sent if the user is not subscribed.
https://leonardo.osnova.io/3fecc943-711d-5dac-b5a3-0c01ef944800/-/format/mp4/#t=0.1;hd=1&autoplay=1
Setting up the scenario for crediting the balance for subscribing to a channel or group
Once the credit goes through, the balance updates, the category is assigned, and the "Get 150 ye for subscribing" button disappears from the personal account.
Scenario: crediting the balance for filling out a questionnaire
Crediting the balance for a questionnaire works much like the subscription, but with fewer commands:
1. A condition button: shown if the user hasn't yet filled out the questionnaire and been credited for it (doesn't have the category).
2. A command (regular or a mini app): opens the questionnaire for the user.
3. An inline command: sent when the questionnaire is completed; it credits the balance and assigns the category.
What to use for the questionnaire:
1. If there are only a few questions, you can use a regular command with the "Input form" block.
2. If there are many questions, a mini app is better: the user can see all the questions at once and answer them in order.
I recommend marking as required only the questions you really need (or all of them, if getting complete information matters).
https://leonardo.osnova.io/15d524e6-1f74-547e-ac24-a0db18696b12/-/format/mp4/#t=0.1;hd=1&autoplay=1
Setting up the scenario for crediting the balance for the questionnaire
Scenario: deducting the balance and granting access to a product
Once a user has saved up enough ye, they can get access to a product: a guide, a lesson or a consultation. When they claim it:
1. The required amount is deducted from the balance.
2. A category is assigned, which changes the button in the personal account from "Get the guide for 150 ye" to "Guide" (the same goes for other products). It also makes a repeat purchase impossible.
What you'll need:
1. A condition button: shown depending on the user's state:
If the user already has the category, the button is shown permanently (for example, "Guide") and leads to the material.
If the user doesn't have the category but has enough balance, the "Get the guide for 150 ye" button is shown, leading to the command that deducts the balance and delivers the product.
If the balance is insufficient, the button isn't shown at all.
2. An inline command: only delivers the product by sending the relevant material or message.
https://leonardo.osnova.io/c40df578-b652-59f0-b5db-3ea258c9a79d/-/format/mp4/#t=0.1;hd=1&autoplay=1
Example scenario setup: deducting the balance and delivering the product
This logic shows users only the buttons that match their current balance and product status, and updates the interface automatically once a product is claimed.
Scenario: manual balance crediting by the admin
Sometimes you need to add ye to a user manually, for example, if they completed a task outside the scenario, took part in an activity or received a bonus. You can do this with a button that only the administrator can see.
For this, you'll use:
1. The global variable balans_gl: created when setting up variables.
2. The "Rights to credit ye" category: created when setting up categories and used to restrict access.
3. A condition button: shows the button to the admin only.
4. A regular command: contains a block with a form for choosing the amount and entering the user's username or user_id, plus a text block with "Yes" and "No" buttons for confirmation.
5. A regular command: sends the selected user an inline command that credits the balance and notifies them.
https://leonardo.osnova.io/c05dd39f-e60f-511b-915c-da34fde5bb34/-/format/mp4/#t=0.1;hd=1&autoplay=1
Example scenario setup: manual balance crediting by the admin
Step 5. Personal account
The personal account is an inline command where the user:
1. Sees their current balance.
2. Learns what they can earn ye for.
3. Sees the products they can get.
4. Can go on to claim rewards (if available).
Setting up the Personal account command
The crediting, deducting and manual top-up scenarios are ready. All that's left is to build the personal account and tie everything together.
1. Open the Constructor section, click + and add an inline command.
2. Choose the Text block and add the text with information.
3. Add an inline keyboard and create buttons:
How to earn ye: you can use a popup or a separate command.
Get 150 ye for subscribing: condition button.
Get 300 ye for the questionnaire: condition button.
Access to the guide: condition button.
Access to the lesson: condition button.
Access to the consultation: condition button.
Access to manual crediting: condition button (shown to admins only).
https://leonardo.osnova.io/869b4a48-fe31-59b4-a949-96c8a5e4c49b/-/format/mp4/#t=0.1;hd=1&autoplay=1
Example personal account setup
All set: now you can set up an internal balance in a chatbot on puzzlebot yourself, crediting ye for activity, deducting it when a product is claimed and managing the balance manually from the admin panel.
Want to ask an expert a question? Leave it in the comments under the latest post in our channel, and the most interesting ones will be covered.